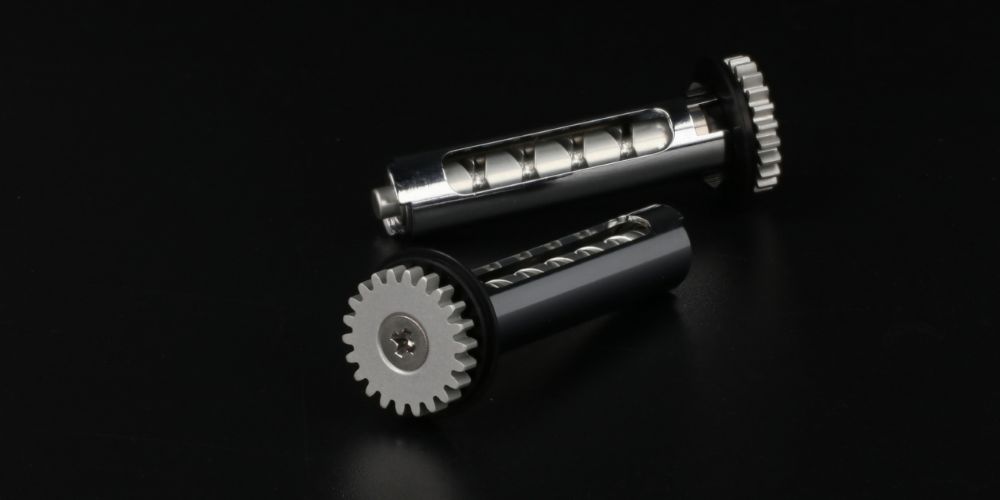
[Avail] ABU Aluminum Worm Shaft 2BB Model for Ambassadeur 1500C/2500C [WS-15C-2BB-S/WS-25C-2BB-S]
![Photo1: [Avail] ABU Aluminum Worm Shaft 2BB Model for Ambassadeur 1500C/2500C [WS-15C-2BB-S/WS-25C-2BB-S] (1)](https://www.hedgehog-studio.co.jp/phone/data/hedgehog-studio/product/20250221_58b518.jpg)
![Photo2: [Avail] ABU Aluminum Worm Shaft 2BB Model for Ambassadeur 1500C/2500C [WS-15C-2BB-S/WS-25C-2BB-S] (2)](https://www.hedgehog-studio.co.jp/phone/data/hedgehog-studio/product/20250221_133e5c.jpg)
![Photo3: [Avail] ABU Aluminum Worm Shaft 2BB Model for Ambassadeur 1500C/2500C [WS-15C-2BB-S/WS-25C-2BB-S] (3)](https://www.hedgehog-studio.co.jp/phone/data/hedgehog-studio/product/20250221_21da6a.jpg)
![Photo4: [Avail] ABU Aluminum Worm Shaft 2BB Model for Ambassadeur 1500C/2500C [WS-15C-2BB-S/WS-25C-2BB-S] (4)](https://www.hedgehog-studio.co.jp/phone/data/hedgehog-studio/product/20250221_9d5a8b.jpg)
![Photo1: [Avail] ABU Aluminum Worm Shaft 2BB Model for Ambassadeur 1500C/2500C [WS-15C-2BB-S/WS-25C-2BB-S] (1)](https://www.hedgehog-studio.co.jp/phone/data/hedgehog-studio/_/70726f647563742f32303235303232315f3538623531382e6a706700313130000074006669745f686569676874.jpg)
![Photo2: [Avail] ABU Aluminum Worm Shaft 2BB Model for Ambassadeur 1500C/2500C [WS-15C-2BB-S/WS-25C-2BB-S] (2)](https://www.hedgehog-studio.co.jp/phone/data/hedgehog-studio/_/70726f647563742f32303235303232315f3133336535632e6a706700313130000074006669745f686569676874.jpg)
![Photo3: [Avail] ABU Aluminum Worm Shaft 2BB Model for Ambassadeur 1500C/2500C [WS-15C-2BB-S/WS-25C-2BB-S] (3)](https://www.hedgehog-studio.co.jp/phone/data/hedgehog-studio/_/70726f647563742f32303235303232315f3231646136612e6a706700313130000074006669745f686569676874.jpg)
![Photo4: [Avail] ABU Aluminum Worm Shaft 2BB Model for Ambassadeur 1500C/2500C [WS-15C-2BB-S/WS-25C-2BB-S] (4)](https://www.hedgehog-studio.co.jp/phone/data/hedgehog-studio/_/70726f647563742f32303235303232315f3964356138622e6a706700313130000074006669745f686569676874.jpg)
Our Selling Price: US$50.05 [Regular Price: US$71.50]
Item Description
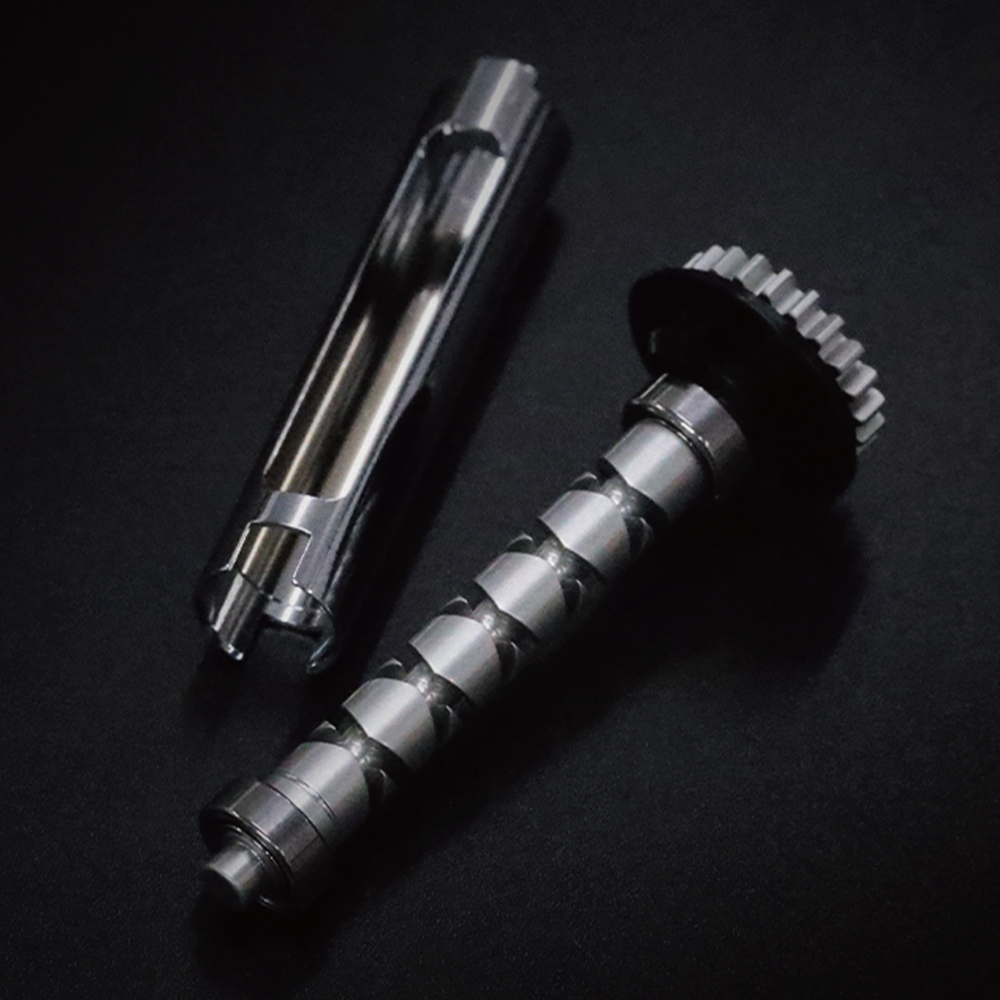
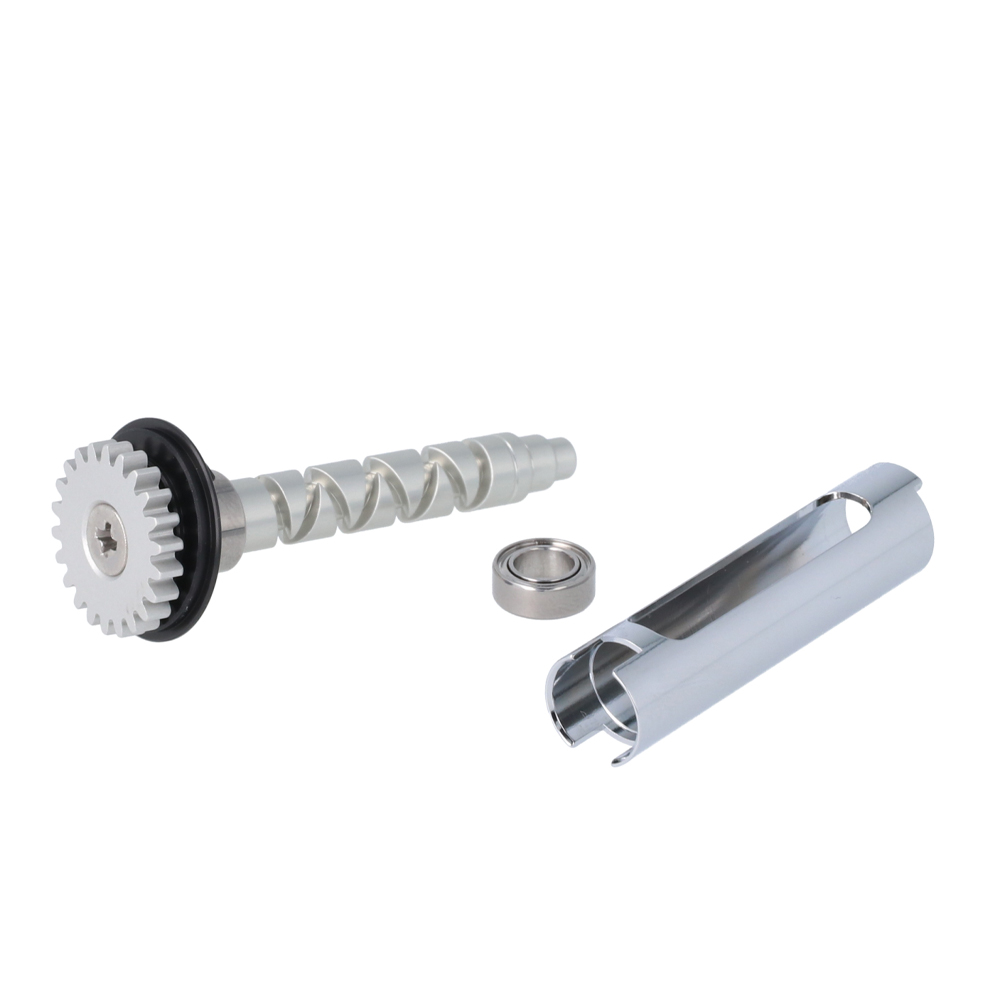
Aluminum Worm Shaft 2BB Model for Ambassadeur 1500C/2500C [WS-15C-2BB-S/WS-25C-2BB-S]
| Product Introduction
This is an aluminum worm shaft with bearings that can be installed on ABU Ambassadeur 1500C/2500C reels.
In addition to the 2-ball bearing specification, lightweight materials have been adopted for each part.
This achieves both improved rotation performance and weight reduction.
This product can be disassembled by "fixing with screws" the "gear", "bearing", and "worm shaft retainer".
As a result, maintainability has also been improved.
Furthermore, by combining Avail's 5152 Cogwheel, Ultra Light Level Winder Set, and Pilot Guide, even greater rotation performance improvement and weight reduction are possible.
It is recommended to purchase and install these parts as a set with the worm shaft.
| Sizes
Aluminum Worm Shaft WS-15C-2BB-S

Aluminum Worm Shaft WS-25C-2BB-S
| Specifications
- Bearing Size
| WS-15C-2BB-S Bearing Size |
7mm×4mm×2.5mm 2 pieces |
| WS-25C-2BB-S Bearing Size |
7mm×4mm×2.5mm 2 pieces |
- Weight Information
| WS-15C-2BB-S | Original |
| 4.1g | 5.6g |
| WS-25C-2BB-S | Original |
| 4.4g | 6.1g |
- Weight may vary slightly depending on the production lot.
- Please refer to the original weight as a guide, as there are many models.
- The weight of Avail worm shafts includes the weight of 2 ball bearings.
| Compatible Reels
| WS-15C-2BB-S Compatible Models |
ABU Ambassadeur 1500C/1500CI/1500C IAR/1500CA Limited/1500CDL/ 1600C/1601C/150PLUS |
| WS-25C-2BB-S Compatible Models |
ABU Ambassadeur 2500C/2500CI/2500C IAR/2500CS Rocket/2500CDL/2501C 2600C/2600C Elite/2601C/2601C Elite/ 3500C/3500C IAR/3500CS Rocket/3500CA Limited |
Important Notes on Compatibility
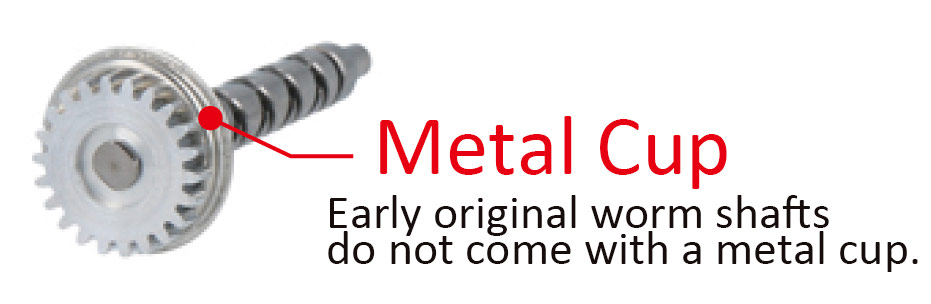
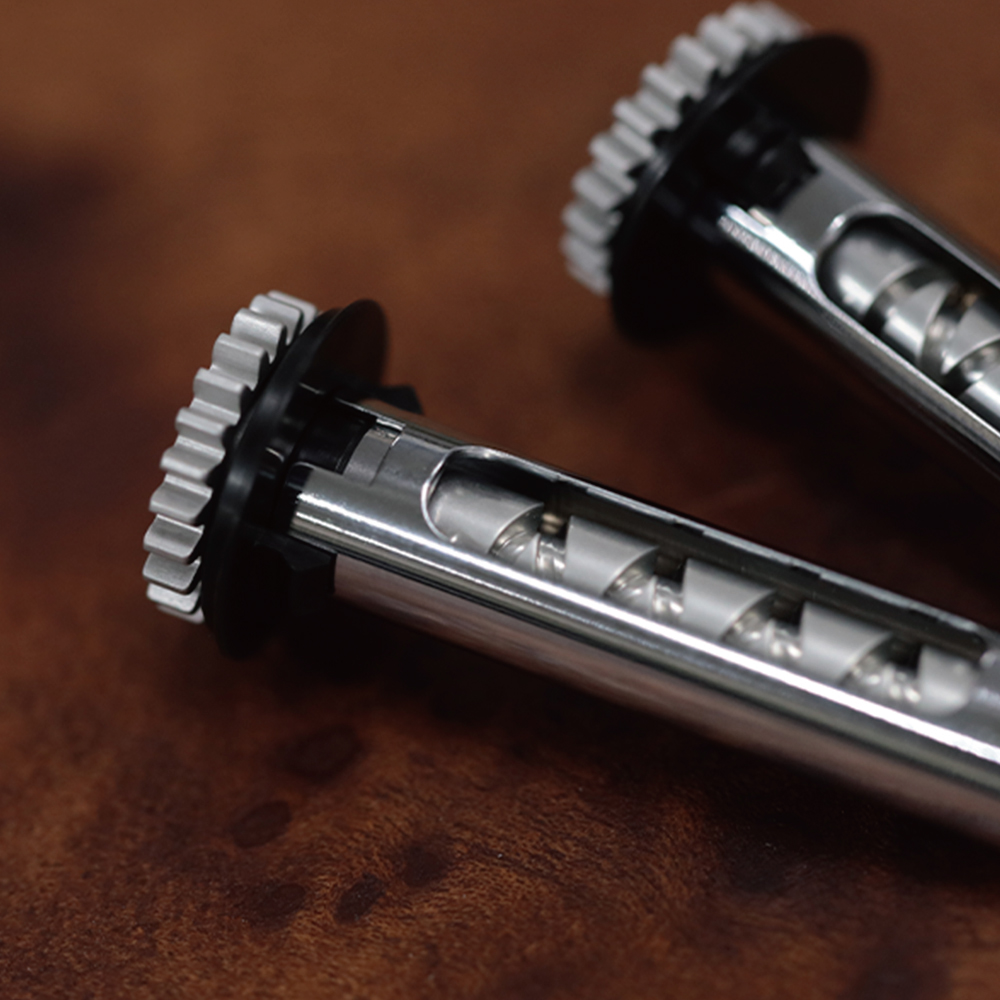
Early original worm shafts do not have the "metal cup" shown in the above image.
Avail products are compatible with reels that have the original worm shaft with the metal cup installed and the original palming plate installed.
(Not compatible with early worm shafts or early palming plates)When replacing an early original worm shaft with an Avail product, it is necessary to purchase and install a palming plate as well.
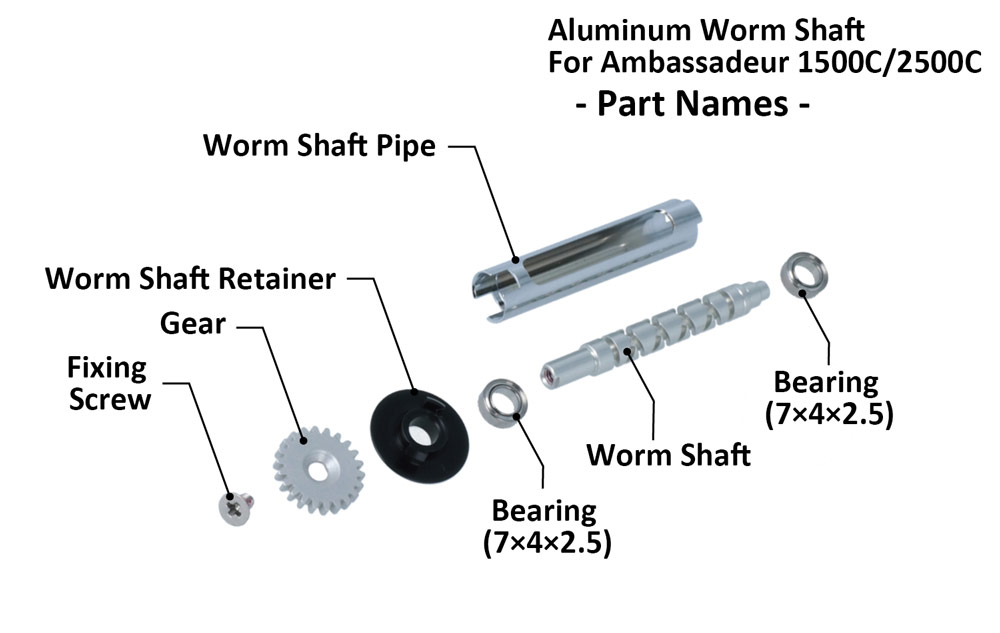
| Parts Names
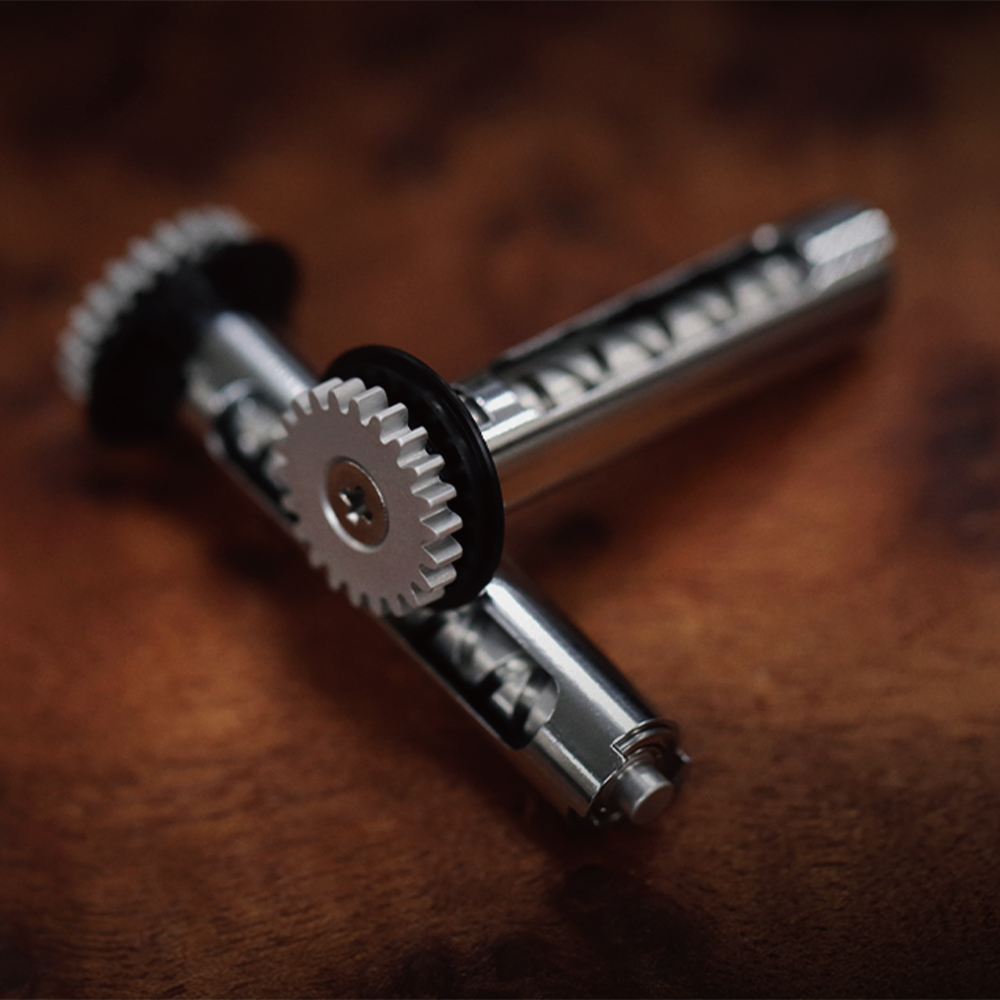
| How to Install the Worm Shaft
Please refer to the above image for the method of installing the worm shaft onto the frame.
*The price is for the old type WS-15C-2BB as of January 2024.
| How to Disassemble and Assemble the Worm Shaft

* During maintenance, please pay attention to the orientation of each part when installing, referring to the above image.
* When removing screws for maintenance, use a cloth or gloves to loosen the screws.
Do the same when reinstalling.
Be careful as there is a risk of injury if you touch the gear part directly.

Let's start with disassembling the worm shaft.
1. Remove the bearing.
2. 3. When you remove the pipe, it separates into the pipe and shaft.
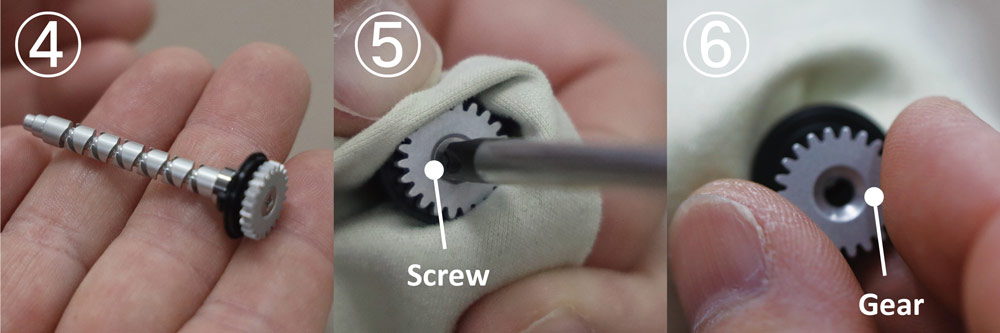
4. After removing the pipe, remove the bearing, worm shaft retainer, gear, and fixing screw attached to the shaft.
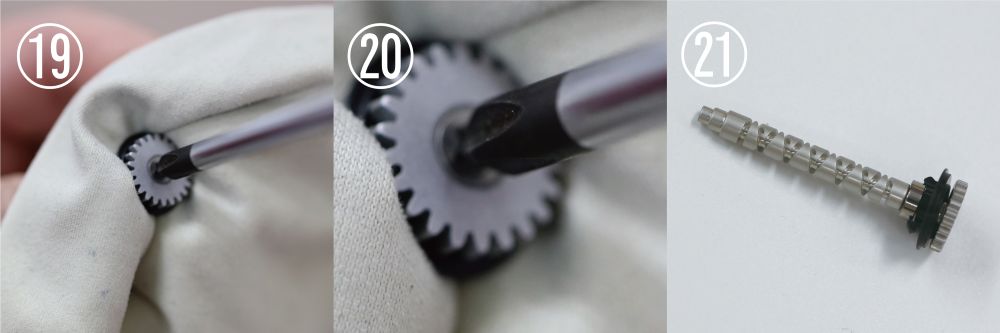
5. When removing the screw, hold the gear part with a cloth. Then, remove the fixing screw using a Phillips screwdriver #1.
*As the gear blade is sharp, there is a risk of injury when loosening the fixing screw. Therefore, use a cloth to protect your fingertips while disassembling.
6. Remove the gear.
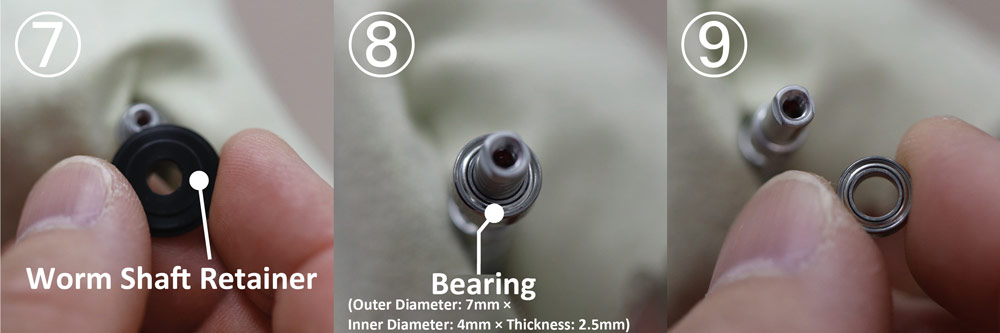
7. Remove the worm shaft retainer.
8.9. Remove the bearing.
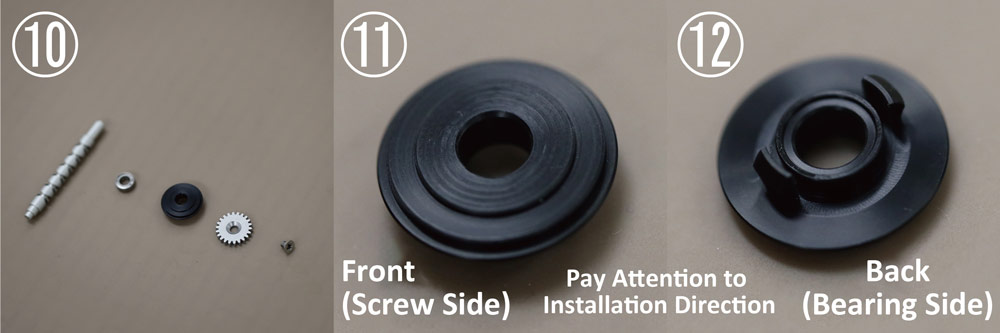
10. The state after removing all parts of the worm shaft. From (13) onwards, it's the assembly explanation.
11. When assembling, pay attention to the orientation of the "worm shaft retainer". (11) is the front (screw side).
12. is the back (bearing side). There are two tabs on the back.
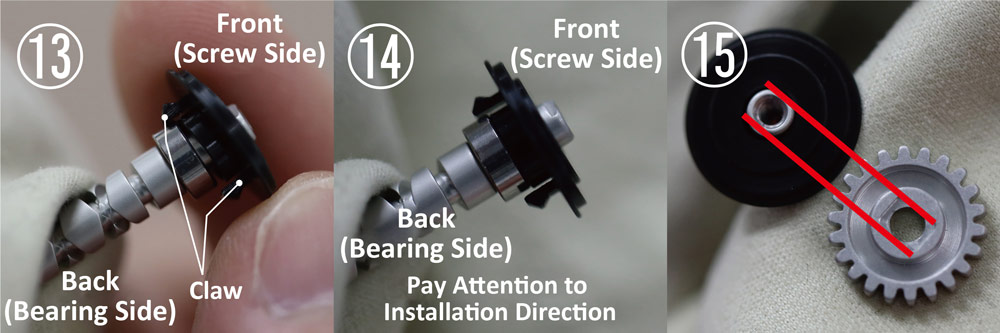
13. Install the bearing followed by the worm shaft retainer onto the shaft.
14. Check the installation direction of the attached worm shaft retainer.
15. When installing the gear, align it so that the notch at the tip of the shaft matches the recess on the back of the gear.
(Align as shown by the red line)
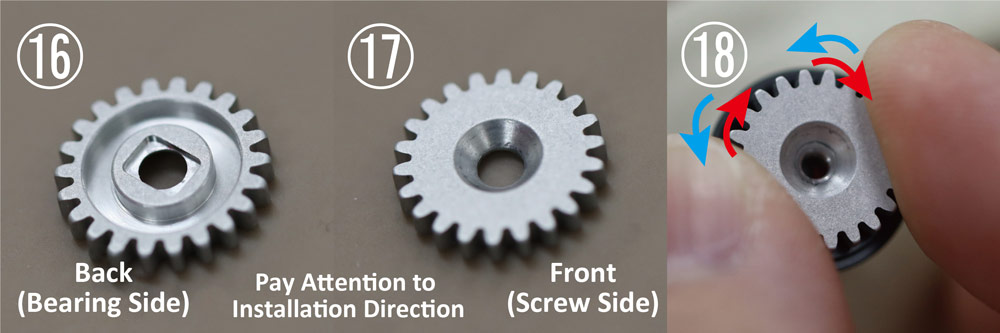
16. This is a close-up photo of the gear. The side in (16) is the back.
The recess in the center of the gear is designed to match the "notch" of the shaft.
17. is the screw side and front.
18. When installing the gear onto the shaft, align the tip of the shaft with the recess of the gear while gently rocking the gear left and right.
19. With the shaft tip and gear recess aligned, start tightening the screw.
*When tightening, use a cloth on the gear part to prevent injury.
20. Use a Phillips screwdriver #1 for tightening.
21. The worm shaft assembly is now complete.
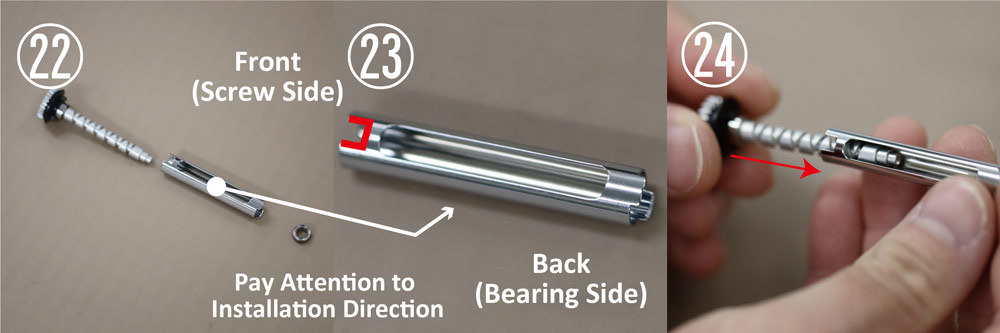
22.23. When attaching the pipe to the worm shaft, install the pipe so that the tabs of the worm shaft align with the notch in the U-shaped part shown in red in 23.
24. Insert the worm shaft in the direction of the red arrow.
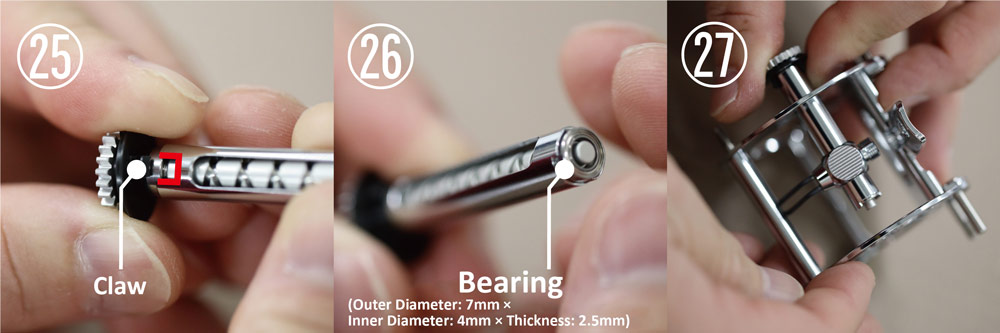
25. Align the tabs of the worm shaft with the notch in the U-shaped part shown in red on the pipe.
26. Insert the bearing on the opposite side.
This completes the assembly of the worm shaft.
27. Install the assembled worm shaft onto the frame.
| Precautions
* The product is coated with "thread locker" to prevent loosening at the time of shipment.
Please note that screws may become loose more easily once removed.
* When removing screws for maintenance, use a cloth or gloves to loosen the screws.
Do the same when reinstalling.
Be careful as there is a risk of injury if you touch the gear part directly.
* Please be careful to avoid losing parts, damaging components, or injuring yourself when installing the purchased product.
| Gallery